When using Git, the changes we make aren't saved automatically. The Git version control system requires us to explicitly select our files before making those changes permanent (committing).
The git add command is used to declare these changes. With this command, the files on our computer (known as the Working Tree in Git terminology) are moved to the Staging Area before being saved. To better understand this concept, you can check out our related article: What is the Staging Area? But let's briefly go over it here;
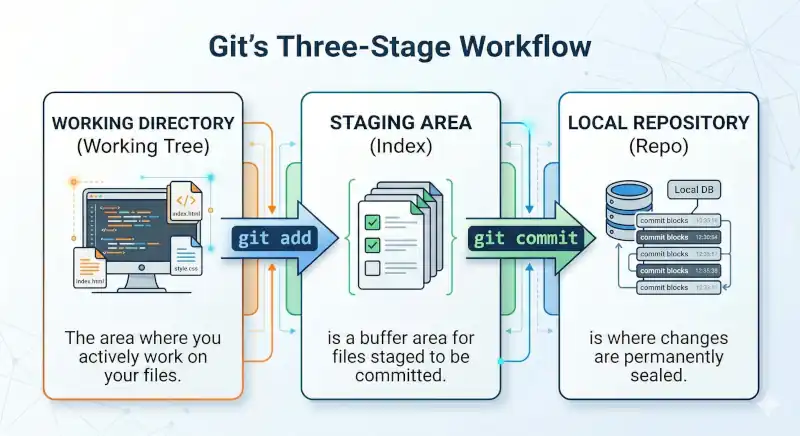
Git's Three-Stage Architecture
- Working Tree (Working Directory): Briefly, it's our project—the area where we actively work on our files.
- Staging Area (Index): This is the buffer zone where files scheduled for versioning are held. We move our files to this area using
git add. - Repository or simply Repo: The area where changes are permanently sealed into history (via git commit).
To explain this with a simple analogy;
- Working Tree: Inside your house. Your belongings (files) are scattered around. You've modified some, bought new ones.
- Staging Area: Think of it as an open shipping box.
- The git add command: The act of selecting items from the house and placing them into the shipping box (you only pack what you actually want to send, right?).
- The git commit command: The act of closing the box's flaps, taping it up, and slapping a label on it like "winter clothes".
So, git add does not close the box. It only serves to put items inside the box (Staging Area). Until you close the box, you can keep adding items with git add or remove them with git restore --staged <file_name>. If you can't remember what you packed, you can always check the list using git status.
Even if you modify a file after moving it to the Staging Area, this buffer zone does not update automatically. You need to stage it again using the git add command, even if it's the exact same file.
What Are the Parameters of the Git Add Command?
Below, the parameters for this command are listed from most frequently used to least.
Git Add . (dot)
What it does: Adds everything it finds in the current directory and its subdirectories—new, modified, and deleted files—to the Staging Area. This includes untracked (new) files.
Why use it: Used to stage all our changes at once quickly.
Git Add "file_name" "file_name"
What it does: Moves only the specific files whose names and paths we provide to the Staging Area. Multiple files are separated by spaces.
Why use it: When we want to commit only a specific feature or a bug fix (the parts we messed up) (e.g., git add index.html style.css).
Git Add *.extension (Adding by Filtering)
What it does: Adds only files with a specific extension. Ex: git add *.css stages only the stylesheet files.
Why use it: It's a lifesaver if you've made both code and visual changes in the project but only want to push the code changes.
Git Add -A or Git Add --all
What it does: Add absolutely everything! Regardless of which folder you are currently in, it moves all added, modified, and deleted files across the entire Working Tree to the buffer zone. Includes untracked (new) files.
Why use it: Very similar to the Git Add dot command, but it covers the entire project, not just your current directory.
What is the Difference Between Git Add . and Git Add -A?
The main difference is the distinction between the "current directory" vs. "entire project". Keep in mind that prior to Git version 2.0, the git add . command did not include deleted files. However, in modern versions, both commands cover deleted files.
Git Add -u or Git Add --update
What it does: Exclusively stages modifications and deletions of already tracked (previously committed) files (no new additions). It does not move newly created, untracked files to the Staging Area.
Why use it: Say we added new files to the project for testing purposes, but we don't want to include them in the commit. It is used to safely stage only the existing files.
"If we are in the root directory of the project, these two commands (.and-A) do the exact same thing." The difference only becomes apparent when you are inside a subdirectory (e.g., the /css folder).
Git Add -p or Git Add --patch (Interactive staging chunk by chunk)
What it does: Shows us the changes in the files chunk by chunk (hunks) and asks, "Stage this hunk?" (y/n).
Why use it: Especially popular among experienced developers and teams with strict code review cultures, it's used to review exactly what is being added line by line and to split different changes within the same file into separate, logical commits.
Git Add -f or Git Add --force
What it does: Forcibly stages files that are otherwise ignored by Git due to rules in your .gitignore file.
Why use it: Imagine there's a log or config file. It's listed in the .ignore file, but we want to make a one-time exception and add it without modifying the .ignore file itself. In this case, we force it in.
Git Add -i or Git Add --interactive (Interactive mode)
What it does: Opens a menu-based interface in the terminal. It allows you to see the status of files and press numbers to choose what to add/remove.
Why use it: Preferred by users who don't use a visual interface (GUI) for Git but want an organized overview in the terminal. Its usage frequency is not as common as the -p parameter.
Git Add -n or Git Add --dry-run (Running for testing purposes)
What it does: If we are afraid of breaking things, running this command shows us exactly which files would be staged.
Why use it: Used as a kind of "rehearsal" in highly complex directory structures or large projects to ensure we don't accidentally break anything.
The git add command does not permanently write any files to the history; it simply sends the files to be included in the next commit to the Staging Area.
In summary, the git add command takes many parameters, and to use them effectively, you can do as much trial and error as you want in a Git simulator.